The Tensorflow detection model zoo provides several extremely useful pre-trained object detection models. And though we have the option of using one of these models in a transfer learning scenario to train our own custom model, occasionally the pre-trained model will provide everything we need.
For example, we may wish to add human actions to our own image classifier. Instead of collecting and labeling images and training our own model, we might decide to employ one of the existing models trained on the AVA dataset and map a subset of these labels to our own taxonomy. For example:
- Stand
- Sit
- Walk
- Run
- Dance
- Fight
These pre-trained models have an expected input of a ‘tensor.’ We can confirm this by downloading and inspecting the model. In the zoo there is just one AVA model. Let’s download and extract the model:
wget http://download.tensorflow.org/models/object_detection/faster_rcnn_resnet101_ava_v2.1_2018_04_30.tar.gz</pre>
tar -xzf faster_rcnn_resnet101_ava_v2.1_2018_04_30.tar.gz
If we have Tensorflow installed we can use the saved_model_cli to inspect it:
saved_model_cli show --dir faster_rcnn_resnet101_ava_v2.1_2018_04_30/saved_model/ --all
Which will return the following:
MetaGraphDef with tag-set: 'serve' contains the following SignatureDefs:

signature_def['serving_default']:
The given SavedModel SignatureDef contains the following input(s):
inputs['inputs'] tensor_info:
dtype: DT_UINT8
shape: (-1, -1, -1, 3)
name: image_tensor:0
The given SavedModel SignatureDef contains the following output(s):
outputs['detection_boxes'] tensor_info:
dtype: DT_FLOAT
shape: (-1, 100, 4)
name: detection_boxes:0
outputs['detection_classes'] tensor_info:
dtype: DT_FLOAT
shape: (-1, 100)
name: detection_classes:0
outputs['detection_scores'] tensor_info:
dtype: DT_FLOAT
shape: (-1, 100)
name: detection_scores:0
outputs['num_detections'] tensor_info:
dtype: DT_FLOAT
shape: (-1)
name: num_detections:0
Method name is: tensorflow/serving/predict
From this we can tell that the expected input is an uint8 image tensor. While this may work with ML Engine, all the other examples I have seen used a different input type: encoded_image_string_tensor.
So, how can we update the saved model so it allows for this different input type? Essentially, we need to install the Tensorflow Object Detection library and then re-export this pre-trained model with the preferred input signature. Note that the outputs seen above will be fine for our purposes (as we will see later).
Follow the installation guide to install the Object Detection library.
Note 1:
I am running Anaconda on a Google Compute instance, and had an issue with bunzip2. I resolved this by first installing bzip2 before beginning the installation process:
sudo apt-get install bzip2
Note 2:
I also had some issues installing Protobuf even though I was following the installation guide. Here are the steps that worked for me:
mkdir protobuf
cd protobuf
wget https://github.com/protocolbuffers/protobuf/releases/download/v3.7.1/protoc-3.7.1-linux-x86_64.zip
unzip protoc-3.7.1-linux-x86_64.zip
Now add the following line to .bashrc in your home directory:
export PATH=/home/dfox/protobuf/bin${PATH:+:${PATH}}
And then activate the modified PATH using source:
source .bashrc
Lastly, you should be able to run the final step in the installation guide. Change directories into TensorFlow/models/research/ and run the following command:
protoc object_detection/protos/*.proto --python_out=.
Exporting the model:
We have downloaded our pre-trained model, and we have installed the Object Detection library. At this point, we can run export_inference_graph.py to modify the input of our pre-trained model. Here is the sample command provided by Google:
python3 export_inference_graph.py \
--input_type encoded_image_string_tensor \
--pipeline_config_path path/to/sample/config \
--trained_checkpoint_prefix path/to/model/checkpoint \
--output_directory path/to/output/for/mlengine
The sample pipeline configs can be found in the Tensorflow repository under object_detection/samples/configs. Pick the config that will work with your model.
Here is the command I used for the AVA model:
python TensorFlow/models/research/object_detection/export_inference_graph.py --input_type encoded_image_string_tensor --pipeline_config_path TensorFlow/models/research/object_detection/samples/configs/faster_rcnn_resnet101_ava_v2.1.config --trained_checkpoint_prefix faster_rcnn_resnet101_ava_v2.1_2018_04_30/model.ckpt --output_directory ava_for_mlengine
Note that there is no file named model.ckpt in the AVA directory; this is the prefix of the files created for the model checkpoint.
Now we should have a directory ava_for_mlengine, with everything we need to deploy this model:
$ ls ava_for_mlengine/

checkpoint model.ckpt.data-00000-of-00001 model.ckpt.meta saved_model
frozen_inference_graph.pb model.ckpt.index pipeline.config
Now our model is ready to be deployed on ML Engine, which we can do using the gcloud command line tool.
We begin by copying our new saved model to a GCS bucket which can be accessed by ML Engine:
gsutil cp -r ava_for_mlengine/saved_model/ ${GCS_BUCKET_NAME}/faster_rcnn_resnet101_ava/
Next we can create our model:
gcloud ml-engine models create faster_rcnn_resnet101_ava --regions us-central1
And finally create our model version (v1):
gcloud ml-engine versions create v1 --model faster_rcnn_resnet101_ava --origin=gs://${YOUR_PROJECT_NAME}/faster_rcnn_resnet101_ava/saved_model --framework tensorflow --runtime-version=1.13
Note that I have specified a runtime version equivalent to my local version of Tensorflow (which we used to export the model). Your version may be different.
This step may take some time. While we wait, let’s download an image for testing:
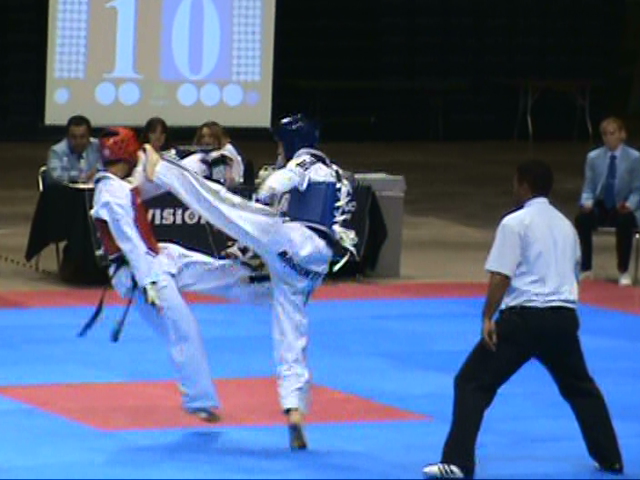
wget https://upload.wikimedia.org/wikipedia/commons/9/9b/Kick.JPG
You can use the code provided by Google for performing an online prediction (found here), but we first need to convert our image into an encoded string.
For a quick test, you can add the following to the script provided by Google:
if __name__ == '__main__':
	instances = []
	for image_path in sys.argv[1:]:
		with open(image_path, "rb") as image_file:
			encoded_string = base64.b64encode(image_file.read()).decode('utf-8')
			instances.append({"b64":encoded_string})
		response = predict_json($MY_PROJECT_NAME,$MY_MODEL_NAME,instances)
		for response in response:
			print(response.keys())
Which will return:
dict_keys(['detection_boxes', 'detection_classes', 'raw_detection_scores', 'detection_scores', 'num_detections', 'raw_detection_boxes'])
The boxes provide the locations of the detected objects, the classes provide a unique key that identifies the detected object, and the scores provide the confidence for each detected object.
And if I am interested in knowing which classes were applied with a particular confidence level:
for c, s in zip(response['detection_classes'], response['detection_scores']):
	if s > .80:
		print(c, s)
Which, for the ‘kick’ image seen above, will return:
11.0 0.8621717691421509
80.0 0.8211425542831421
80.0 0.8173160552978516
To figure out which classes these keys indicate, I need to download the AVA concept mappings. These can be found here. The relevant labels:
label {
name: "sit"
label_id: 11
label_type: PERSON_MOVEMENT
}

label {
name: "watch (a person)"
label_id: 80
label_type: PERSON_INTERACTION
}
So, we did not detect any kicking with any confidence. There are two kick related labels (35 and 71), but neither appear even in an unfiltered list of the detected classes.
At this point, if my intention was to create a sports specific action detector, that would perform well on photos of martial arts events, I might train my own object detection model. I might also decide to use AVA as a baseline for transfer learning.
